Solar & Battery Shutdown & Restart Guide
Solar & Battery Shutdown & Restart Guide
How to De-Energise and Re-Energise Your System (Shutdown/Restart or Power Cycle) Guide
IMPORTANT NOTICE: The following guide has been created to assist with 1KOMMA5° Sydney & Melbourne (Formerly Solaray Energy Systems). If your system was installed by another installer, this guide should help, but some equipment and steps may differ.
All photos provided are for reference only, be sure to inspect your system and its labelling.
One of the first steps to troubleshooting your solar system if you notice that there is a
monitoring error, is to complete a Power Cycle, also known as a shutdown/restart or more commonly referred to as “turning it off and on again”.
This is a basic and common step to get your system back up and running and is a great thing to have in your arsenal to save on service callouts.
Your solar system should have a “Solar System Shutdown Procedure” located in one of the following locations:
- Your meter board or main switch board.
- A sub-board, which the solar is connected to.
- The solar inverter or monitoring device, usually located in the vicinity of the meter board.
Once you locate the Shutdown Procedure, be sure to follow the instructions in order to de-energize the system. We have included some helpful tips below to make the process easier for you.
Main Switch Solar Supply/Inverter Supply
Main Switch – Showing (Inverter Supply) |
Main Switch – Showing Solar Supply Main Switch |
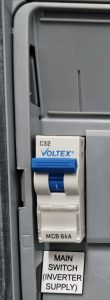 |
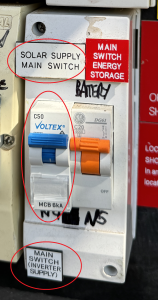 |
This is what your switch may look like if your are unable to locate it, the switch will be marked with some kind of signage that indicates it is for your solar or your inverter (part of your solar/battery system). Be sure to take note of whether the I or O is visible on the switch, especially if it is oriented horizontally rather than vertically.
DC Isolator
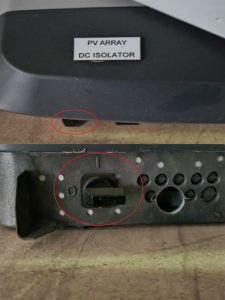
Please be aware: Newer solar inverters will usually have a DC isolator switch on the inverter, rather than it being a seperate switch, as it was with older systems. The examples below highlight what you should be looking for.
SolarEdge Inverter – DC Isolator Located on Front Face of the Unit. |
Sungrow Inverter – DC Isolator Located on Side Face of the Unit. |
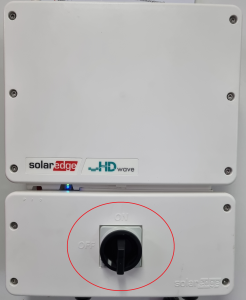 |
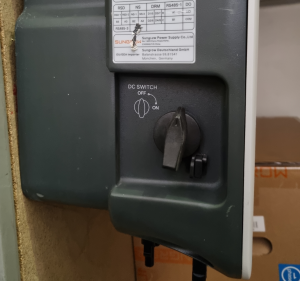 |
Fronius Inverter – DC Isolator Located Underneath Inverter (with DC Label) |
DC Isolator Seperate to Inverter |
 |
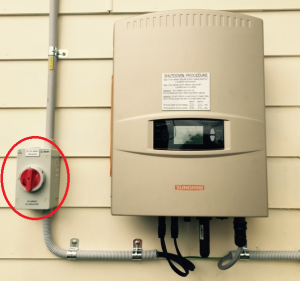 |
This is what your DC isolator should look like and should be located on or near your solar system. Take note of whether your isolator is set to “I” (ON) or “O” (OFF).
Main Switch Battery Supply
Tesla Powerwall – Main Switch (Battery Supply) |
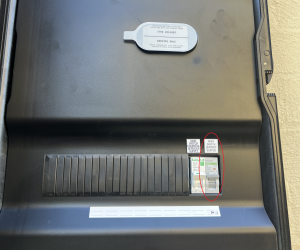
Enphase IQ Battery – IQ Battery System AC Isolator #1 |
 |
 |
This is what your switch may look like if you are unable to locate it, the switch will be marked with some kind of signage that indicates it is for your solar or your inverter (part of your solar/battery system). Be sure to take note of whether the “I” (ON) or “O” (OFF) is visible on the switch, especially of it is oriented horizontally rather than vertically.
Battery and Solar System Procedure
For AC SystemsExample: Enphase Solar System |
For DC SYstemsExample: SolarEdge, Sungrow, Fronius etc. |
|
|
Power Cycle FAQs
How long do I leave my system off?
We recommend leaving the entire system off for 15 – 30 minutes.
How do I turn the system back on?
Follow all previous steps in reverse to re-energise your system.
How long do I leave the system once I have switched it back on?
Leave the system for approximately 60 minutes to give it time to boot back up correctly and search for the necessary Wi-Fi networks it will try to connect to.
What do I do if there is still an issue after the restart?
If you have completed the above restart correctly and the issue persists, we recommend calling your inverter manufacturer directly regarding the issue. You can notify them you have already completed the shutdown/restart procedure (also called a Power Cycle) and they will walk you through more troubleshooting, per their most recent updates. Please see contact numbers for inverter manufacturers below:
Enphase: 1800 006 374
SolarEdge: 1800 465 567
Sungrow: 1800 786 476
Fronius: (03) 8340 2900
Sonnen: 137 666
SMA: (02) 9491 4200
ABB/FIMER: 1800 769 663
After speaking to the manufacturer, they will resolve the issue or provide you with the next steps. If your manufacturer flags that we will need to attend to the site and assist in the rectification, please ensure you provide their internal case number for the issue so that we can better assist.
